Art & Crafts

tagged Animals

The thing with wings

Dragon wings tend to be more or less bat-based, but photos of bats in flight tend to be rarer than ones of birds in flight, making studies a bit more difficult.

For birds I recommend the deviantart account of Cheryl Moore, where you can find a great number of photos of birds in flight - most of them white birds, meaning there is no pattern on the feathers distracting from the shape.

As for bats, during the last week some photos of bats drinking from a pond in flight went through the bits of blogosphere I watch. Looking up Kim Taylor brought up Warren Photographic, which has more (albeit smaller) photos of bats in flight.

On Deviantart I found one compact tutorial on bat wings by cactusart.

The wing tutorial by Kandice Zimbleman-Wang may be a bit weird on the formatting and spelling side, but content-wise I find it very helpful.

For the sake of completeness and comparison, you could look at pterosaurs wings, too. (What intersts me more after a bit of poking around wikipedia are the various head shapes, though. Fascinating.)

Fimo Monsters

So, I was working on a bit more Fimo stuff, and my mother asked me if I had some sort of red pendant. I didn't, so I made one, and since she wants to wear it the day after tomorrow, I rushed a bit and didn't make some of the things I wanted to try out.

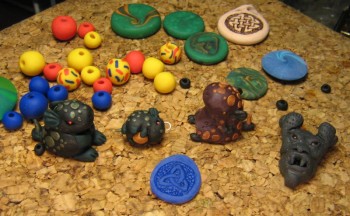
Since Mutt asked for photos of the draggies, here is a quick preview photo of nearly all of the stuff (click for bigger view):
fimostuff

The two sitting dragons are 2,5 cm = 1 inch tall, the little one is smaller. I made a rush job of the red-and-gold one, placing the eyes too low, and I forgot smoothing the belly properly, so I had to go at it with sandpaper, and will have to buff it up again.

For the scales for a change I tried to cut thin slices of some Fimo rolled out into a thin string and stick them on right away, rather than rolling tiny little spheres and mushing those onto the dragon, but with the metallic effect Fimo that doesn't work well, probably something about mica shift. I'll keep it in mind for normal colours, though, it's way, way, way faster.

The gargoyle head has eyes just like the two black and green dragons, they just don't shine because of the angle. The eyes are rocailles or seed beads or whatever you call them. The important thing to keep in mind is that they get embedded with the side facing outwards, not the hole.
Anyway, back to the gargoyle head: that one was planned as a pendant, but I messed up the balance and it's not usable as such. Maybe I'll repurpose it as a magnet, even if it'll have random holes in it...

Apart from the mentioned problems I am quite happy with those last two pieces; I think I noticed improvement from previous attempts. Yay, practise.

I'm going to test the gold leaf I got for the jewellery design course on the blue thing in the foreground.

On the brownish thing in the background, I tried painting the thing for an aging effect before baking with sepia acrylic ink, and sand it afterwards. The ink gave the clay under it a reddish tint in places, and I nearly get the impression it's in too deep to sand off. Next time, bake first.

Speaking of baking, or curing or what you want to call it: The little dragon charm, which cannot stand up, and the beads I baked in a bed of flour to avoid the shiny "pressure" mark I got otherwise. It worked fine. :)

Anything else i forgot? Oh, well.

Merry Christmas.

Blog tags: Art & Crafts

Art-things going "click" in my head

Sometimes, it takes some additional input to understand advice.

One thing is the "draw lines with one long stroke, not by adding up lots of smaller lines" one. I never understood how that would be possible, until I came across advice on how to improve your handwriting saying you should use your shoulder and back muscles, not your wrist and fingers for writing. Doesn't mean I can magically DO it, but at least I have some idea of what I might try to learn.

Another are the scribble pictures. I remember doing those in art class back at school. Here's the idea:
You scribble random loops and lines on a piece of paper
Then you look at it, and turn it into an image of whatever you happen to see in it.

I thought the idea was drawing over the lines as they were on the paper, so mostly I ended up with blobby rubbish, like snakes without heads, three-story mushrooms, or faces like this one:

Then I came across a tutorial at deviantart, which is not safe for work due to nudity, and looking at the example... You could add stuff. You could turn a circle into a face, or a hand. Yeah, I see how that might actually be fun, rather than frustrating, and result in more interesting images.

[caption id="attachment_392" align="aligncenter" width="500" caption="Here's the original scribble; lines darkened digitally to make sure they show up; actually I use very light pencil lines. I also turned the sheet around a bit until I spotted something..."][/caption]

[caption id="attachment_394" align="aligncenter" width="500" caption="I saw a head and a wing, and went from that..."][/caption]

[caption id="attachment_395" align="aligncenter" width="500" caption="Added feet and tail and refined some details. Would look better if I traced it on a clean sheet in ink, but I'll leave it as the little warmup practise it is."][/caption]

I guess that's a good time to upload some of the more interesting results of those warmup-practises.

The following four are other sketches, from my figure drawing class, and people who want to avoid nudity should avoid those.

Spiral Sun Cane

I got a biiig box of art supplies in the mail today, mostly paper and Fimo. While I'd been waiting for it, I had an idea for a cane, and here's the result:

The blue was mixed of equal parts Fimo Classic blue and Fimo Soft white (later experiments make me think 4 parts white and one part blue is better for sky blue). Yellow is Fimo Soft sunflower, and the red-orange layer was orange and yellow scraps mixed with indian red.

I rolled out the sunflower and the mixed blue on the thickest setting - 1 - of my pasta machine, and put two layers of each together, for thicker layers. I rolled out the orange-red mix on setting 7, pretty thin, and wrapped the yellow with it - note that the ends are wrapped, too. Then I rolled it up in a spiral.

For the sun rays I rolled a long sausage of yellow, wrapped it in more of the red-orange rolled out at thicknees 7, shaped it slightly triangular in profile, and cut it into lengths corresponding to the height of the spiral. Then I rolled more of the mixed blue into sausages and filled out the gaps between the rays.

Last I rolled out the rest of the blue mix to wrap the outside. I didn't have enough left for two layers at thickness 1, so it's one at 1 and 1 at 2 or 3.

If I try that again, I might use a thicker layer of yellow, or otherwise thinner and in turn more rays.

Blog tags: Art & Crafts Resources
Syndicate content